
Cherry pie bars offer the perfect balance between a classic cherry pie and a convenient handheld treat. With a buttery crust, luscious cherry filling, and a sweet glaze, they make an excellent dessert for any occasion. These bars are easier to prepare than a traditional pie while still delivering the same delightful flavors.
Whether you’re baking for a gathering, a holiday, or simply craving a fruity dessert, this cherry pie bars recipe is a must-try. The crisp, golden crust holds a juicy, tart cherry filling, creating a contrast of textures that make each bite irresistible. Plus, the simple glaze on top adds just the right amount of sweetness.
In this guide, you’ll find detailed instructions, expert baking tips, and common mistakes to avoid to ensure your cherry pie bars turn out perfect every time. Let’s dive into the process of making this delightful treat from scratch!
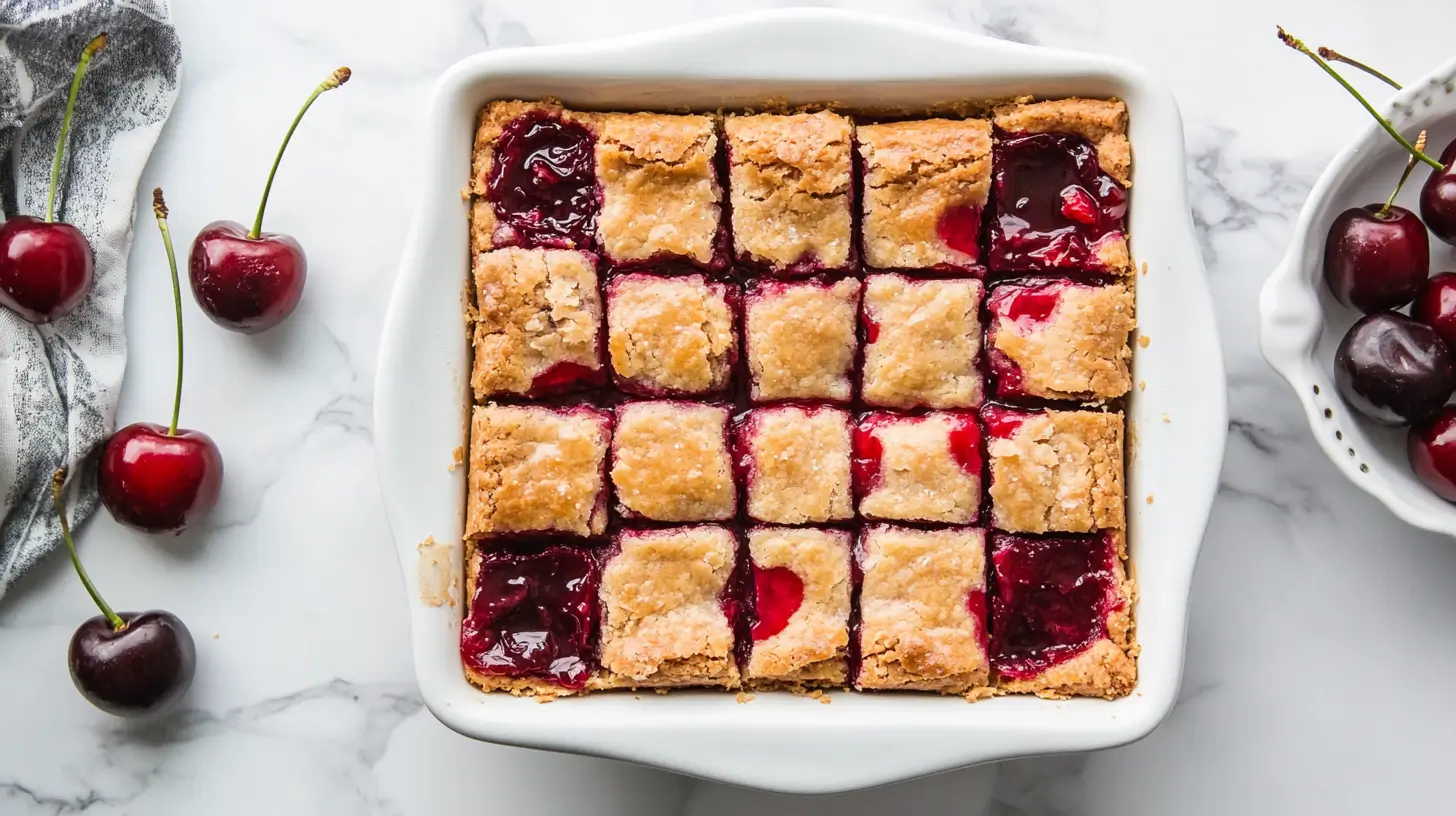
Cherry Pie Bars
Equipment
- 9×13-inch baking dish
- mixing bowls
- hand mixer or stand mixer
- saucepan
- whisk
- rubber spatula
- measuring cups and spoons
- cooling rack
- knife for slicing
Ingredients
- 2 1/2 cups all-purpose flour
- 1 cup unsalted butter, softened
- 3/4 cup granulated sugar
- 1/2 tsp salt
- 1/2 tsp baking powder
- 1 tsp vanilla extract
- 1 large egg
- 4 cups fresh or frozen cherries, pitted
- 3/4 cup granulated sugar (for filling)
- 2 tbsp cornstarch
- 1 tbsp lemon juice
- 1/2 tsp almond extract (optional)
- 1 cup powdered sugar
- 2 tbsp milk or heavy cream
- 1/2 tsp vanilla extract (for glaze)
Instructions
- Preheat the oven to 350°F (175°C) and grease a 9×13-inch baking dish.
- In a large bowl, beat together the butter and sugar until light and fluffy.
- Add the egg and vanilla extract; mix until well combined.
- In a separate bowl, whisk together the flour, salt, and baking powder.
- Gradually add the dry ingredients to the creamed mixture and stir until a soft dough forms.
- Press 2/3 of the dough evenly into the prepared pan; reserve the rest for topping.
- In a saucepan over medium heat, combine cherries, sugar, and lemon juice.
- Bring to a simmer, stirring occasionally, until the cherries release their juices.
- Mix cornstarch with 2 tablespoons water to make a slurry.
- Stir the slurry into the cherries and cook, stirring, until thickened.
- Remove from heat, stir in almond extract, and let cool slightly.
- Spread the cherry filling evenly over the crust.
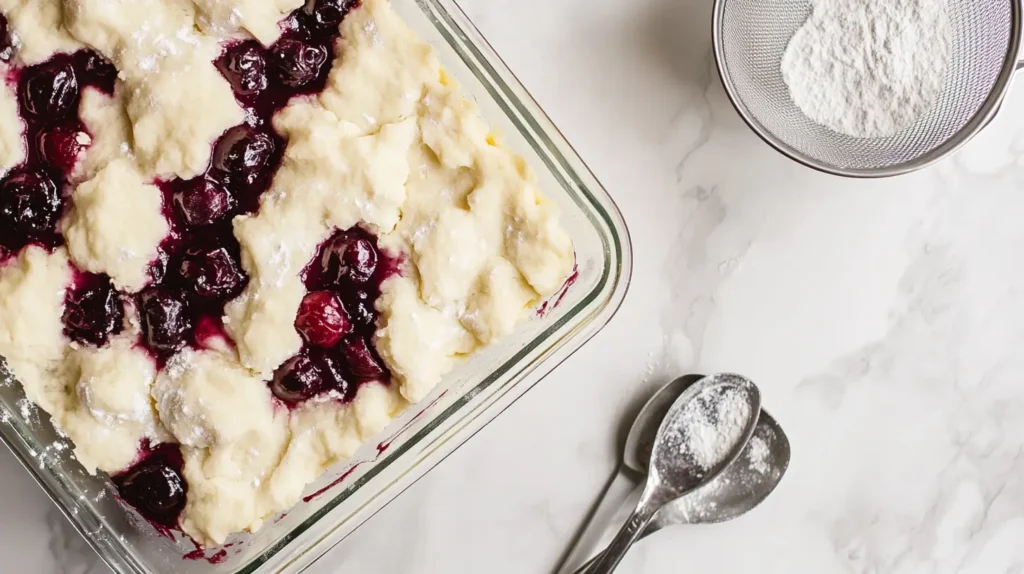
- Crumble the remaining dough evenly over the top (let some cherries peek through).
- Bake for 40–45 minutes or until the top is golden brown.
- Cool completely in the pan before glazing.
- Whisk together powdered sugar, milk or cream, and vanilla until smooth.
- Drizzle glaze over cooled bars.
- Let the glaze set, then slice into squares and serve.
Notes
Nutrition
All nutritional information is based on third party calculations and is only an estimate. Each recipe’s nutritional value will vary depending on the ingredients used, measuring methods, and portion sizes.
Benefits of Cherry Pie Bars
Making cherry pie bars instead of a traditional pie comes with several advantages:
- Easier to Make: There’s no need to roll out dough or worry about achieving the perfect pie crust.
- More Convenient: These bars are easy to cut and serve, making them perfect for large gatherings.
- Balanced Flavor: The combination of buttery crust, tart cherry filling, and sweet glaze creates a well-rounded dessert.
- Customizable: You can use fresh, frozen, or canned cherries, and even experiment with different fillings.
- Great for Storage: They stay fresh for days and are easy to freeze for later.
If you’re looking for a dessert that’s simple to prepare but still packed with flavor, these cherry pie bars are the perfect choice.
Ingredients
Gathering high-quality ingredients is the first step to making the best cherry pie bars.
For the Crust and Topping
A buttery and crumbly crust serves as the base and the topping. You’ll need:
- 2 ½ cups all-purpose flour
- 1 cup unsalted butter, softened
- ¾ cup granulated sugar
- ½ teaspoon salt
- ½ teaspoon baking powder
- 1 teaspoon vanilla extract
- 1 large egg
For the Cherry Filling
The key to delicious cherry pie bars is a flavorful filling. Use:
- 4 cups fresh or frozen cherries, pitted
- ¾ cup granulated sugar
- 2 tablespoons cornstarch
- 1 tablespoon lemon juice
- ½ teaspoon almond extract (optional, for extra flavor)
For the Glaze
A simple glaze adds a touch of sweetness:
- 1 cup powdered sugar
- 2 tablespoons milk or heavy cream
- ½ teaspoon vanilla extract
With these ingredients ready, let’s move on to the step-by-step baking process.
Step-by-Step Instructions
Step 1: Prepare the Crust
- Preheat the oven to 350°F (175°C) and grease a 9×13-inch baking dish.
- In a large bowl, beat together the butter and sugar until light and fluffy.
- Add the egg and vanilla extract, mixing until well combined.
- In a separate bowl, whisk the flour, salt, and baking powder.
- Gradually add the dry ingredients to the wet mixture, stirring until a dough forms.
- Press ⅔ of the dough evenly into the bottom of the prepared pan. Set the remaining dough aside for the topping.
Step 2: Make the Cherry Filling
- In a saucepan over medium heat, combine the cherries, sugar, and lemon juice.
- Bring to a simmer, stirring occasionally, until the cherries release their juices.
- In a small bowl, mix the cornstarch with 2 tablespoons of water to create a slurry.
- Add the cornstarch mixture to the cherries, stirring constantly, until the filling thickens.
- Remove from heat and stir in the almond extract. Let the filling cool slightly before assembling the bars.
Step 3: Assemble and Bake
- Pour the cherry filling evenly over the crust.
- Crumble the remaining dough over the filling, ensuring some cherries peek through.
- Bake for 40–45 minutes, or until the top turns golden brown.
- Let the bars cool in the pan before adding the glaze.
Step 4: Make the Glaze
- In a small bowl, whisk together the powdered sugar, milk, and vanilla extract.
- Drizzle the glaze over the cooled bars.
- Let the glaze set before slicing into squares.
Baking Tips for the Best Cherry Pie Bars
To achieve the perfect texture and flavor, keep these baking tips in mind:
- Use cold butter when making the crust for a flakier texture.
- Allow the cherry filling to cool before layering it over the crust to prevent sogginess.
- Bake until golden brown to ensure the crust is crisp.
- Let the bars cool completely before slicing to prevent them from falling apart.
- Store in an airtight container at room temperature for up to three days or refrigerate for a longer shelf life.
Common Mistakes to Avoid
Many bakers run into a few common issues when making cherry pie bars. Avoid these mistakes for the best results:
- Not thickening the filling properly: If the cherry filling is too runny, the bars will be messy. Always use cornstarch or an alternative thickener.
- Skipping the cooling process: Cutting the bars while they’re still warm can cause them to crumble.
- Using too much dough on top: The right balance between crust and filling ensures a perfect texture.
- Overbaking the bars: Baking too long can make the crust too hard and dry.
By following these tips and avoiding common pitfalls, you’ll create cherry pie bars that are both visually appealing and delicious.
Variations
One of the best things about cherry pie bars is their versatility. You can easily adjust the recipe to suit different tastes and dietary needs. Here are a few creative variations:
Fruit Substitutions
- Swap cherries for blueberries, raspberries, or blackberries for a different flavor.
- Use a mixed berry filling for a more complex taste.
- Try peach or apple filling for a warm, spiced version of these bars.
Dietary Adjustments
- For a gluten-free version, use a gluten-free flour blend.
- To make it vegan, replace butter with plant-based margarine and use a flax egg.
- Reduce the sugar for a lower-sugar option without compromising taste.
Flavor Enhancements
- Add cinnamon or nutmeg to the crust for extra warmth.
- Mix in chopped nuts like almonds or pecans for crunch.
- Substitute almond extract with vanilla or lemon zest for a subtle twist.
These modifications allow you to enjoy cherry pie bars in new and exciting ways!
Storage & Shelf Life
Proper storage ensures your cherry pie bars remain fresh and delicious for days. Follow these guidelines to maintain their texture and flavor:
Room Temperature Storage
- Store the bars in an airtight container at room temperature for up to 2 days.
- Keep them in a cool, dry place away from direct sunlight to prevent spoilage.
Refrigeration
- For longer storage, refrigerate the bars in a sealed container for up to 5 days.
- Let them come to room temperature before serving for the best taste.
Freezing Instructions
- Wrap each bar individually in plastic wrap, then place them in a freezer-safe bag.
- Store for up to 3 months in the freezer.
- Thaw overnight in the refrigerator or warm slightly in the microwave before serving.
Following these storage tips will help your cherry pie bars stay fresh and enjoyable for as long as possible.
Nutrition Information (Per Serving)
Knowing the nutritional content of cherry pie bars can help with meal planning. Below is an approximate breakdown based on a standard 2-inch square serving:
| Nutrient | Amount per Serving |
|---|---|
| Calories | 220 kcal |
| Carbohydrates | 32g |
| Sugar | 18g |
| Protein | 3g |
| Fat | 9g |
| Saturated Fat | 5g |
| Cholesterol | 30mg |
| Sodium | 80mg |
| Fiber | 2g |
These values may vary depending on the ingredients used, especially if substitutions are made.
Pairing Suggestions
Enhance the experience of enjoying cherry pie bars with the perfect pairings.
Beverages
- Coffee or espresso – The slight bitterness balances the sweetness.
- Black tea or herbal tea – Complements the fruity filling.
- Cold milk – A classic pairing that softens the tartness.
- Sparkling wine or rosé – A great option for a special occasion.
Serving Ideas
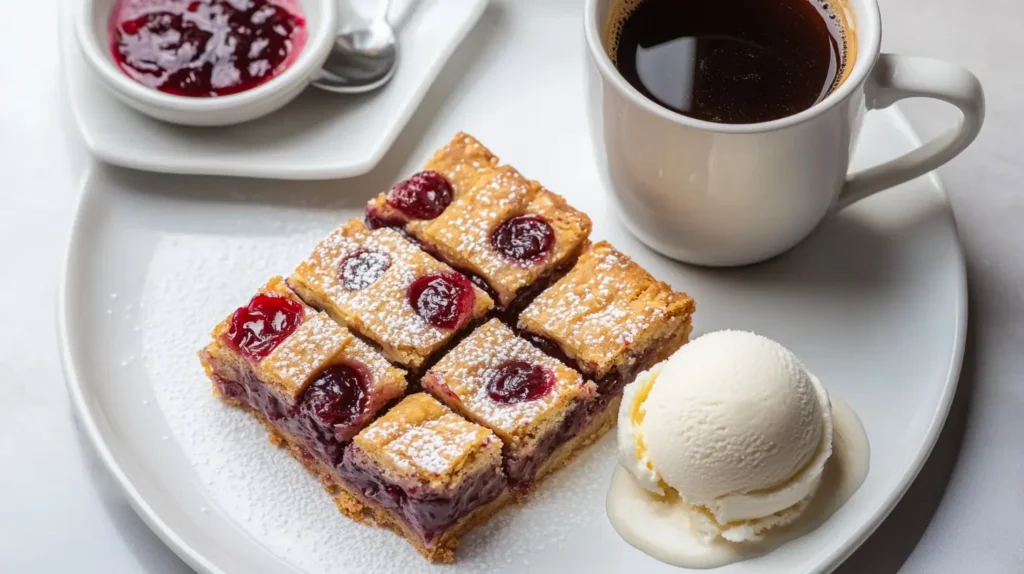
- Warm cherry pie bars and serve with a scoop of vanilla ice cream.
- Drizzle with chocolate sauce for a richer dessert.
- Sprinkle powdered sugar on top instead of glaze for a more delicate look.
- Serve alongside a whipped cream topping for extra indulgence.
Pairing these bars with the right drinks and accompaniments makes them even more satisfying.
FAQs about Cherry Pie Bars
Can I use canned cherries?
Yes, you can use canned cherries to make cherry pie bars, but there are a few adjustments to keep in mind. If using canned cherries in syrup, be sure to drain them well to avoid excess moisture. If using cherry pie filling, reduce the added sugar in the recipe to prevent the bars from becoming too sweet.
For best results:
- Use pitted canned cherries and add lemon juice to balance the sweetness.
- If the filling is too thin, mix in 1 tablespoon of cornstarch to thicken it before assembling the bars.
- Taste and adjust the sugar to your preference.
Using canned cherries makes the recipe even more convenient, especially when fresh cherries are out of season.
How do I prevent a soggy crust?
A soggy crust can ruin the texture of cherry pie bars, but you can prevent this with a few key techniques:
- Pre-bake the crust: Bake the bottom layer for 8–10 minutes before adding the filling. This creates a firmer base.
- Thicken the cherry filling: If the filling is too runny, add extra cornstarch to ensure it thickens properly.
- Cool the filling slightly: Pouring hot filling onto the crust can cause it to absorb too much moisture. Let it cool for a few minutes first.
- Avoid overloading with filling: Using too much filling can overwhelm the crust and make it too soft.
By following these tips, you’ll achieve a perfectly crisp base every time.
Can I make cherry pie bars ahead of time?
Yes! Cherry pie bars are an excellent make-ahead dessert, as they taste even better the next day once the flavors have settled.
Here’s how to store them properly:
- At room temperature: Keep them in an airtight container for up to 2 days.
- In the refrigerator: Store them for up to 5 days in a sealed container.
- In the freezer: Wrap each bar in plastic wrap and freeze for up to 3 months. Thaw in the fridge overnight before serving.
If making them ahead for an event, consider adding the glaze just before serving for the freshest taste and best presentation.
What can I use instead of almond extract?
Almond extract adds a rich, nutty flavor that pairs well with cherries, but if you don’t have it or prefer something else, try these alternatives:
- Vanilla extract – A milder but classic flavor option.
- Lemon or orange zest – Adds a fresh, citrusy twist.
- Coconut extract – Offers a unique, tropical flavor.
- Maple extract – Creates a warm, slightly caramelized taste.
While almond extract enhances the traditional cherry pie bars flavor, these substitutes work well to tailor the recipe to your taste.
How do I cut perfect bars?
Getting clean, even slices can make your cherry pie bars look as good as they taste. Here’s how to do it:
- Let the bars cool completely: Cutting while warm can cause them to crumble.
- Use a sharp knife: A large, sharp knife ensures cleaner cuts.
- Wipe the knife between cuts: This prevents filling from sticking and keeps edges neat.
- Chill before slicing: Refrigerating for 30 minutes makes the bars firmer and easier to cut.
For extra precision, use a ruler to mark even sections before cutting.
Can I use a different fruit?
Absolutely! While cherries are the classic choice, you can easily substitute them with other fruits for a new twist. Here are some great alternatives:
- Blueberries – Naturally sweet and pair well with lemon zest.
- Raspberries – Slightly tart, offering a bold flavor.
- Peaches – Perfect for a summery variation.
- Apples – Add cinnamon for a cozy, autumn-inspired treat.
- Strawberries – Sweet and juicy, ideal for a fresh twist.
When substituting fruit, adjust the sugar and thickening agent (like cornstarch) based on the fruit’s natural sweetness and moisture content.
By making simple adjustments, you can customize cherry pie bars to match your favorite flavors!
Conclusion
Cherry pie bars bring the nostalgic taste of cherry pie in an easy-to-make format, perfect for casual snacking or special occasions. Their buttery crust, tart cherry filling, and sweet glaze create a delightful balance of flavors.
By exploring different variations, storing them properly, and pairing them with complementary flavors, you can make the most out of this recipe. Whether you’re baking for a gathering or just treating yourself, these bars offer a delicious way to enjoy the essence of homemade cherry pie without the hassle of a traditional crust.
Try making a batch today and savor the flavors of this irresistible dessert!


